Introduction
Mehndi or Simple Mehndi Design, also known as henna, is an ancient form of body art that has been practiced for centuries across various cultures, especially in South Asia, the Middle East, and Africa. It involves applying a paste made from the powdered leaves of the henna plant to create intricate designs on the skin. Simple mehndi designs are perfect for beginners and those who prefer a more minimalist look. This comprehensive guide will explore the history of mehndi, its cultural significance, and provide step-by-step instructions for creating beautiful and easy mehndi designs.
History and Cultural Significance of Mehndi
Mehndi has a rich history that dates back thousands of years. It is believed to have originated in ancient Egypt, where it was used for its cooling properties and as a cosmetic dye. Over time, mehndi spread to other parts of the world, including India, Pakistan, and the Arabian Peninsula, where it became an integral part of various cultural and religious practices.
In Indian culture, mehndi is an essential part of wedding ceremonies and festivals like Diwali and Karva Chauth. Brides often have their hands and feet adorned with elaborate mehndi designs, which symbolize beauty, love, and joy. In Arabic culture, mehndi is also used for weddings and other celebrations, with designs typically featuring floral and geometric patterns.
Types of Mehndi Designs
Mehndi designs can be categorized into several styles, each with its unique characteristics. Here are some of the most popular types:
- Indian Mehndi Designs: Known for their intricate patterns, Indian mehndi designs often include peacocks, paisleys, and other motifs inspired by nature.
- Arabic Mehndi Designs: These designs are typically simpler than Indian mehndi and feature bold, floral, and geometric patterns.
- Moroccan Mehndi Designs: Characterized by their geometric shapes and symmetry, Moroccan mehndi designs are unique and eye-catching.
- Pakistani Mehndi Designs: A blend of Indian and Arabic styles, Pakistani mehndi designs are elaborate and detailed, often covering the entire hand and arm.
- Simple Mehndi Designs: Ideal for beginners, these designs are easy to create and feature minimalistic patterns that are elegant and beautiful.
Materials Needed for Mehndi Application
Before you start creating Simple Mehndi Design, you’ll need to gather the necessary materials. Here’s a list of items you’ll need:
- Henna Cone or Paste: You can buy pre-made henna cones or make your own paste using henna powder, lemon juice, and essential oils.
- Applicator: Henna cones are the most common applicators, but you can also use a fine-tipped squeeze bottle or a toothpick for more precision.
- Lemon-Sugar Solution: This helps to seal the henna and enhance the color.
- Cotton Balls: For applying the lemon-sugar solution.
- Plastic Wrap or Tissue Paper: To cover the design and keep it moist.
- Tissues or Paper Towels: For wiping away mistakes.
- Essential Oils: Such as eucalyptus or lavender oil, to mix into the henna paste for a darker stain.
Preparing the Henna Paste
If you decide to make your own henna paste, follow these steps:
- Sift the Henna Powder: This ensures a smooth paste without any lumps.
- Mix the Henna Powder with Lemon Juice: Add lemon juice to the henna powder gradually until it reaches the consistency of mashed potatoes.
- Add Essential Oils: Mix in a few drops of essential oil to enhance the color and fragrance.
- Let the Paste Rest: Cover the mixture with plastic wrap and let it sit for 6-12 hours to allow the dye to release.
- Adjust the Consistency: Before using the paste, add a little more lemon juice to achieve the consistency of thick yogurt.
Simple Mehndi Designs for Beginners
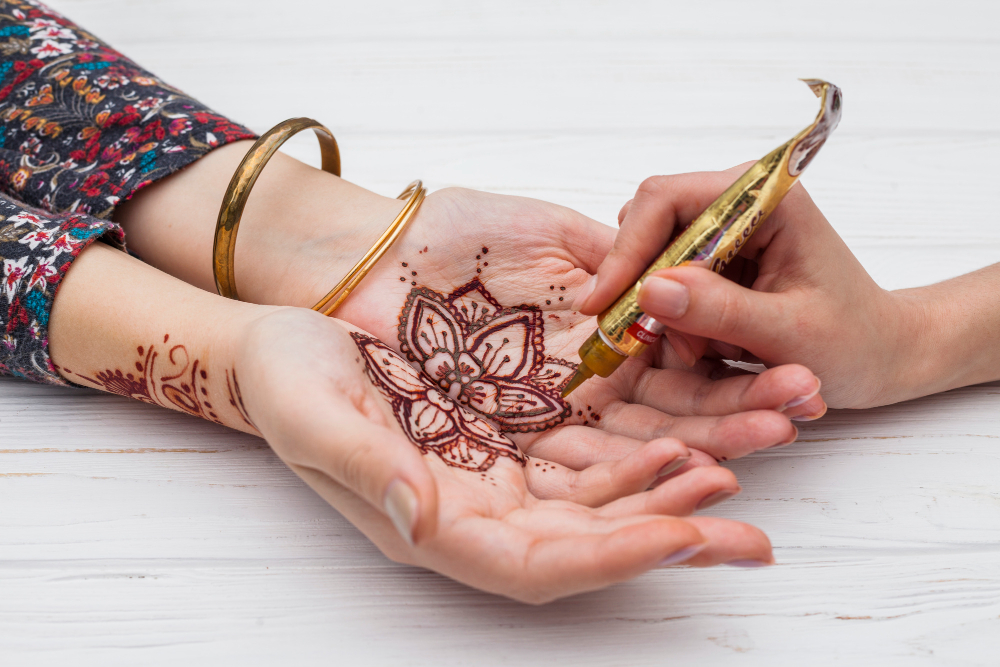
Floral Patterns
Step-by-Step Guide:
- Start with a Simple Flower: Begin by drawing a small circle in the center of your hand. This will be the base of your flower.
- Add Petals: Draw petals around the circle, keeping them evenly spaced. You can add more layers of petals for a fuller look.
- Add Leaves and Vines: Extend the design by adding leaves and vines around the flower. This will give your design a more complete look.
Tips:
- Keep the lines thin and delicate for a more elegant design.
- Practice drawing flowers on paper before applying them to your skin.
Geometric Patterns
Step-by-Step Guide:
- Draw a Simple Border: Start with a straight line across the back of your hand or along your wrist.
- Add Geometric Shapes: Draw triangles, diamonds, or squares along the border.
- Fill in the Shapes: Add smaller shapes or dots inside the larger shapes for added detail.
Tips:
- Use a ruler to practice straight lines on paper.
- Geometric designs are ideal for creating symmetrical patterns.
Paisley Patterns
Step-by-Step Guide:
- Draw a Basic Paisley Shape: Start with a teardrop shape, curving it slightly to one side.
- Add Details Inside the Paisley: Fill the shape with smaller paisley patterns, dots, and lines.
- Extend the Design: Add more paisley shapes around the main one to create a cohesive pattern.
Tips:
- Practice drawing paisley shapes on paper before applying them to your skin.
- Use a reference image for inspiration.
Tips for Perfecting Your Mehndi Design
- Practice on Paper: Before applying mehndi to your skin, practice drawing designs on paper. This will help you get a feel for the patterns and improve your precision.
- Use a Steady Hand: Sit comfortably and keep your hand steady while applying the mehndi. This will help you create clean, precise lines.
- Start with Simple Designs: If you’re a beginner, start with simple designs and gradually move on to more complex patterns as you gain confidence.
- Take Your Time: Don’t rush the process. Take your time to ensure each line and shape is perfect.
- Keep the Paste Moist: To get a darker stain, keep the henna paste moist by applying a lemon-sugar solution and covering it with plastic wrap.
Aftercare for Mehndi Designs
Proper aftercare is essential to ensure your mehndi design lasts as long as possible and achieves a dark, rich color. Here are some tips for aftercare:
- Let the Paste Dry Completely: Allow the henna paste to dry on your skin for at least 4-6 hours. The longer you leave it on, the darker the stain will be.
- Avoid Water: Keep your mehndi design away from water for at least 12 hours after removing the paste. Water can prevent the stain from developing fully.
- Apply Lemon-Sugar Solution: Dab a mixture of lemon juice and sugar onto the dried henna paste to help it stay moist and enhance the color.
- Keep the Design Warm: Heat can help darken the henna stain. You can sit near a heater or use a hairdryer on a low setting to warm the design.
- Avoid Scraping Off the Paste: Gently scrape off the dried paste using a blunt object or your fingernails. Avoid washing it off with water.
- Moisturize: Apply a natural oil, such as coconut or olive oil, to the design to keep it moisturized and prevent it from fading too quickly.
Common Mistakes to Avoid
- Using Old Henna Paste: Always use fresh henna paste for the best results. Old paste may not stain as well.
- Not Letting the Paste Rest: If you make your own henna paste, make sure to let it rest for the recommended time to allow the dye to release.
- Applying Too Thick a Layer: Applying the henna paste too thickly can cause it to crack and fall off before it fully dries.
- Not Keeping the Design Moist: Keeping the paste moist with a lemon-sugar solution helps the stain develop better.
- Exposing the Design to Water Too Soon: Avoid getting the design wet for at least 12 hours after removing the paste.
Conclusion
Creating Simple Mehndi Design doesn’t have to be complicated. With practice and patience, anyone can master the art of simple mehndi design. Whether you’re preparing for a special occasion or just want to adorn your hands with elegant patterns, this guide provides everything you need to get started. Remember to take your time, practice regularly, and most importantly, have fun with your designs. Happy mehndi designing!
FAQs
Q1: What is Mehndi?
A1: Mehndi, also known as henna, is a form of body art originating from ancient India, where decorative designs are created on the skin using a paste made from the powdered dry leaves of the henna plant.
Q2: What are the benefits of using Mehndi?
A2: Mehndi is not only a beautiful form of body art but also has cooling properties that can soothe the skin, and its natural ingredients can help strengthen and condition hair and nails.
Q3: What are some simple Mehndi designs for beginners?
A3: Beginners can start with basic designs like floral patterns, simple vines, paisleys, dots, and lines. These are easy to create and look elegant.
Q4: How long does Mehndi take to apply?
A4: The application time for Mehndi depends on the complexity of the design. Simple patterns can take as little as 15-30 minutes, while more intricate designs might take a few hours.
Q5: How long does Mehndi last on the skin?
A5: Mehndi typically lasts for about 1-2 weeks on the skin. The color gradually fades as the skin exfoliates naturally.
Q6: How can I make my Mehndi design darker and longer-lasting?
A6: To make your Mehndi darker and longer-lasting, leave the paste on the skin for at least 6-8 hours or overnight. Avoid washing the area for at least 24 hours and apply lemon-sugar mixture or essential oils to enhance the color.
Q7: What are the best occasions to apply Mehndi?
A7: Mehndi is traditionally applied during festive occasions, weddings, and celebrations like Diwali, Eid, and Karva Chauth. However, it can be worn anytime as a form of personal adornment.
Q8: Can I create my own Mehndi paste at home?
A8: Yes, you can create your own Mehndi paste at home using henna powder, lemon juice, sugar, and essential oils. Mix these ingredients to form a smooth paste, let it sit for a few hours, and then it’s ready to use.
Q9: Is Mehndi safe for all skin types?
A9: Mehndi is generally safe for all skin types as it is made from natural ingredients. However, it’s recommended to do a patch test before full application to ensure there is no allergic reaction.
Q10: Can children apply Mehndi?
A10: Yes, children can apply Mehndi. It is a fun and safe activity for kids, especially during festivals and family gatherings.
Q11: What are some tips for beginners to improve their Mehndi skills?
A11: Beginners can improve their Mehndi skills by practicing regularly, starting with simple designs, and gradually moving to more complex patterns. Watching tutorials and using Mehndi stencils can also be helpful.
Q12: How do I remove Mehndi stains from my skin if needed?
A12: To remove Mehndi stains, you can scrub the area with a mixture of baking soda and lemon juice, use a gentle exfoliating scrub, or soak the area in warm water. However, these methods may not completely remove the stain immediately and might require multiple attempts.
Q13: What are the different styles of Mehndi?
A13: There are several styles of Mehndi, including Indian, Arabic, Pakistani, and African. Each style has its unique patterns and techniques.
Q14: Can Mehndi be used for hair coloring?
A14: Yes, Mehndi can be used as a natural hair dye. It provides a reddish-brown color and can also condition and strengthen the hair.
Q15: Where can I find Mehndi design inspirations?
A15: You can find Mehndi design inspirations from online platforms like Pinterest, Instagram, and YouTube, as well as from Mehndi design books and magazines.